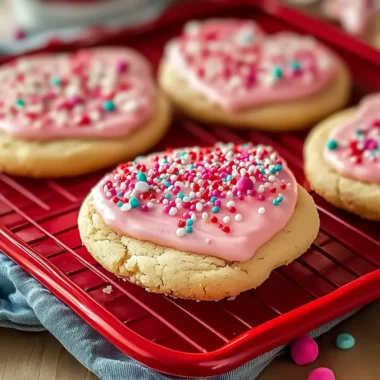
When the air is filled with love and the calendar marks February, I can hardly resist baking something truly special. This Valentine’s Day, why not indulge your sweetheart with a batch of delightful Lip Cookies? Imagine opening your oven to the intoxicating scent of buttery cookies perfectly shaped to resemble luscious lips—how fun and flirty!

Creating these cookie masterpieces not only adds a personal touch to your festivities, but they’re also surprisingly easy to whip up, even for those who might shy away from baking. With just a handful of simple ingredients, you’ll craft a treat that’s as visually stunning as it is delicious.
These cookies are the ultimate combination of charm and flavor, making them a sure hit at any gathering—or simply as a sweet surprise for your loved ones. Grab your apron, and let’s dive into this delightful baking adventure!
Why You'll Love This Lip Cookies
- These Lip Cookies are incredibly easy to make, perfect for even novice bakers who want to impress.
- The delightful flavor combination of buttery cookie and sweet icing will have everyone asking for seconds.
- Their charming lip shape makes for a visually appealing treat that adds a fun twist to your Valentine’s celebrations.
- These cookies are versatile enough to be customized with different colors and designs, allowing you to express your creativity while baking.
Lip Cookies Ingredients
Craft the perfect Lip Cookies with these simple ingredients!
For the Cookie Dough
- 1 1/4 cups unsalted butter – the foundation of your cookies for a rich, buttery flavor.
- 2 1/4 cups powdered sugar – adds sweetness and helps create a tender texture in the cookie dough.
- 1 1/2 teaspoons vanilla extract – enhances the flavor profiles, making your cookies taste divine.
- 1 large egg – binds the ingredients together, ensuring your cookies hold their shape.
- 3 cups all-purpose flour – provides structure for the cookies, creating the perfect base.
- 1 teaspoon baking soda – helps the cookies rise and achieve a delightful chewiness.
- 1/2 cup cream of tartar – stabilizes the egg whites in your royal icing and gives cookies a tangy flavor.
For the Royal Icing
- 4 large egg whites – make for a meringue-like icing that sets beautifully on your cookies.
- 1/2 cup vanilla extract – ensures your icing is just as tasty as the cookies themselves.
- 1/4 teaspoon almond extract – adds a lovely, fragrant note that complements the sweetness of the icing.
- 5 1/2 cups powdered sugar (sifted) – essential for achieving that perfect icing consistency.
For Decoration
- Red food coloring – brings your Lip Cookies to life with eye-catching color that shouts Valentine’s Day!
How to Make Lip Cookies
-
Preheat your oven to 350°F (175°C) and line a baking sheet with parchment paper. This ensures your cookies bake evenly and won’t stick—got to keep those lovely lip shapes intact!
-
Sift together the flour, baking soda, and cream of tartar in a bowl. A little sift action helps remove lumps and guarantees a silky cookie dough with the perfect texture.
-
Cream the unsalted butter and powdered sugar together until light and fluffy. The goal is that heavenly buttery blend, about 3-5 minutes, which makes the base of your Lip Cookies utterly delightful!
-
Mix in the vanilla extract after creaming. This step infuses the dough with a sweet aroma, making your kitchen smell incredible from the get-go!
-
Incorporate the large egg into the fluff mixture. Beat until combined, then slowly add your dry ingredients. Go gentle on mixing to keep the dough tender yet sturdy.
-
Knead the dough gently for about 1 minute. This helps bring it together beautifully without overworking the gluten, ensuring every bite is soft and tender.
-
Roll out the dough to about 1/2 inch thick on a floured surface, and then cut into fun lip shapes with your cookie cutter. Feel free to use different cutters for added variety and whimsy!
-
Bake in the preheated oven for about 8 minutes, or until the edges are set. You want them to be just golden—over-baking can lead to crispy edges instead of the perfect chewy center we all adore.
-
Cool the cookies on a wire rack for about 10 minutes. Allowing them to cool helps maintain their shape and gives you the perfect canvas for decorating!
-
Prepare royal icing by whisking egg whites and cream of tartar together until frothy. This creates a lovely base for your cookie decoration!
-
Add powdered sugar gradually to the icing, mixing until you achieve a consistency that holds peaks. You want it thick enough to pipe, yet smooth for spreading.
-
Divide the icing into portions and add red food coloring as desired. Mix until you get that beautiful, vibrant color that screams Valentine’s Day!
-
Decorate the cookies with your colored icing and let them dry overnight. Getting creative here is half the fun; feel free to mix it up with patterns!
-
Repeat decorating the bottoms of the cookies if you want an extra wow factor. The more love you place into this decorating, the more impressive they will be!
-
Pipe final details with white icing after the cookies have completely dried. This step adds finesse and those charming finishing touches that will make your Lip Cookies irresistible!
Optional: Add sprinkles for an extra festive flair before the icing sets.
Exact quantities are listed in the recipe card below.
Make Ahead Options
These Lip Cookies are ideal for busy home cooks looking to save time without sacrificing quality! You can prepare the cookie dough up to 24 hours in advance; simply wrap it tightly in plastic wrap and refrigerate. When you’re ready to bake, let the dough sit at room temperature for about 10 minutes before rolling out to cut into shapes. Additionally, the royal icing can be made up to 3 days ahead and stored in an airtight container; just give it a good stir before using to achieve the right consistency. This way, when it’s time to decorate, you can simply pipe your colors and let your creativity shine, producing beautiful, delicious Lip Cookies with minimal effort!
What to Serve with Lip Cookies?
Imagine a charming gathering with uncomplicated companions that match the sweetness and fun of your Lip Cookies.
-
Milkshake Delight: A rich, creamy milkshake balances the sweetness of the cookies while adding a fun, indulgent element to your dessert spread.
-
Fresh Strawberries: Dip them in a bit of chocolate for a dual delight, enhancing the light, fruity essence of your Lip Cookies.
-
Coffee or Espresso: The warm, robust flavors perfectly contrast with the sweetness, creating a heartwarming experience for any gathering. A perfect pick-me-up!
-
Whipped Cream Dip: Serve alongside your cookies for an extra layer of decadence. The fluffiness adds a delightful texture with each bite!
-
Chocolate-Covered Pretzels: The salty crunch of pretzels contrasts beautifully with the sweet icing on your cookies, creating a fun, moreish snack.
-
Sparkling Rosé: For a festive vibe, pour a glass of sparkling rosé. The bubbles and light flavors elevate your dessert experience into something truly special.
-
Vanilla Ice Cream: A classic combo, the cold, creamy texture pairs wonderfully with the warm cookies, perfect for a cozy evening treat.
-
Honey or Maple Drizzle: Drizzle over the top of your Lip Cookies for an unexpected twist; their floral sweetness makes each bite enchanting.
How to Store and Freeze Lip Cookies
Room Temperature: Store your Lip Cookies in an airtight container at room temperature for up to 5 days, ensuring they stay fresh and delicious.
Fridge: For longer-lasting cookies, you can refrigerate them in an airtight container for up to 10 days, but be mindful that the icing might lose some glossiness.
Freezer: Freeze uniced cookies in a single layer, then transfer to a freezer-safe bag for up to 3 months. Iced cookies can also be frozen, but it’s best to freeze them without decoration.
Reheating: If you desire a warm cookie, you can reheat in a 300°F (150°C) oven for about 5 minutes. This will refresh their texture and flavor beautifully!
Lip Cookies Variations
Feel free to personalize your Lip Cookies with these fun and delicious tweaks that will evoke all the taste and texture you desire.
- Gluten-Free: Use a 1:1 gluten-free all-purpose flour blend to keep the flavor while accommodating dietary needs without sacrificing taste!
- Nutty Twist: Incorporate 1/2 cup of finely ground almonds or hazelnuts into the dough for a delightful nutty flavor that complements your cookies beautifully.
- Citrus Zest: Add the zest of one lemon or orange to the dough for a refreshing, bright flavor that adds a delightful zing to each cookie.
- Chocolate Chip Surprise: Fold in 1 cup of mini chocolate chips for a fun, melty surprise with every bite, making these cookies even more irresistible.
- Spicy Kick: Sprinkle in 1/2 teaspoon of ground cinnamon or cayenne for a surprising warmth and depth that enhances the sweetness of the icing.
- Cream Cheese Icing: Swap half of the powdered sugar for cream cheese to create a tangy icing that beautifully balances the sweetness of the cookies.
- Sugar-Free: Substitute powdered sugar with a sugar alternative like erythritol to make your Lip Cookies diabetic-friendly without compromising flavor.
- Decorative Flair: Use edible glitter or heart-shaped sprinkles on top of the icing for an extra festive touch that makes your cookies pop in a way that shouts love!
Chef's Helpful Tips
- When making Lip Cookies, ensure your butter is at room temperature for easy creaming with the powdered sugar, which is crucial for a light texture.
- Avoid overmixing the dough once you incorporate the dry ingredients to keep the cookies from becoming tough.
- For accurate baking, use an oven thermometer to confirm your oven is truly at 350°F, as incorrect temperatures can lead to uneven baking.
- Remember to allow cookies to cool completely on a wire rack before icing, as warm cookies can cause the icing to melt and lose its shape.
Lip Cookies Recipe FAQs
What type of butter should I use for Lip Cookies?
Absolutely! I recommend using unsalted butter for Lip Cookies; it gives you better control over the sweetness. Make sure the butter is at room temperature to ensure it creams well with the sugar, resulting in a light and fluffy dough.
How should I store Lip Cookies once they’re baked?
For optimal freshness, store your Lip Cookies in an airtight container at room temperature for up to 5 days. If you want to prolong their shelf life, refrigerate them in an airtight container for up to 10 days. Just remember, the icing may lose some glossiness in the fridge!
Can I freeze Lip Cookies, and how do I do it?
Certainly! To freeze uniced Lip Cookies, lay them on a baking sheet to freeze individually, then transfer them to a freezer-safe bag or container for up to 3 months. For iced cookies, it’s best to freeze them without decoration. When ready to enjoy, let them thaw at room temperature.
What should I do if my royal icing is too runny?
Very! If your royal icing has turned out too runny, simply add more sifted powdered sugar, a little at a time, until you achieve a thick enough consistency that holds peaks and is perfect for piping. Remember, consistency is key in achieving those stunning decorations.
Are there any dietary considerations for Lip Cookies?
Absolutely! If you have allergies, be cautious with the egg whites, and you can substitute them with an egg replacer for a vegan option. Since these cookies do contain gluten and dairy, consider using gluten-free flour blends and dairy-free butter if needed. Always check ingredients for any hidden allergens!
Lip Cookies
Ingredients
Equipment
Method
- Preheat your oven to 350°F (175°C) and line a baking sheet with parchment paper.
- Sift together the flour, baking soda, and cream of tartar in a bowl.
- Cream the unsalted butter and powdered sugar together until light and fluffy.
- Mix in the vanilla extract after creaming.
- Incorporate the large egg into the fluff mixture and beat until combined.
- Knead the dough gently for about 1 minute.
- Roll out the dough to about 1/2 inch thick on a floured surface, and cut into fun lip shapes with your cookie cutter.
- Bake in the preheated oven for about 8 minutes, or until the edges are set.
- Cool the cookies on a wire rack for about 10 minutes.
- Prepare royal icing by whisking egg whites and cream of tartar together until frothy.
- Add powdered sugar gradually to the icing, mixing until you achieve a consistency that holds peaks.
- Divide the icing into portions and add red food coloring as desired.
- Decorate the cookies with your colored icing and let them dry overnight.
- Repeat decorating the bottoms of the cookies if you want an extra wow factor.
- Pipe final details with white icing after the cookies have completely dried.