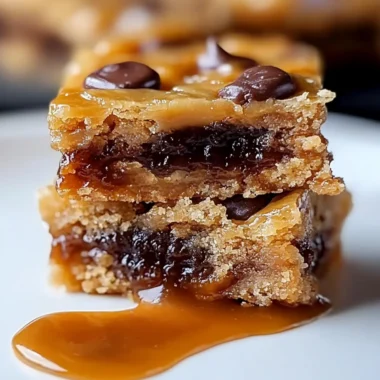
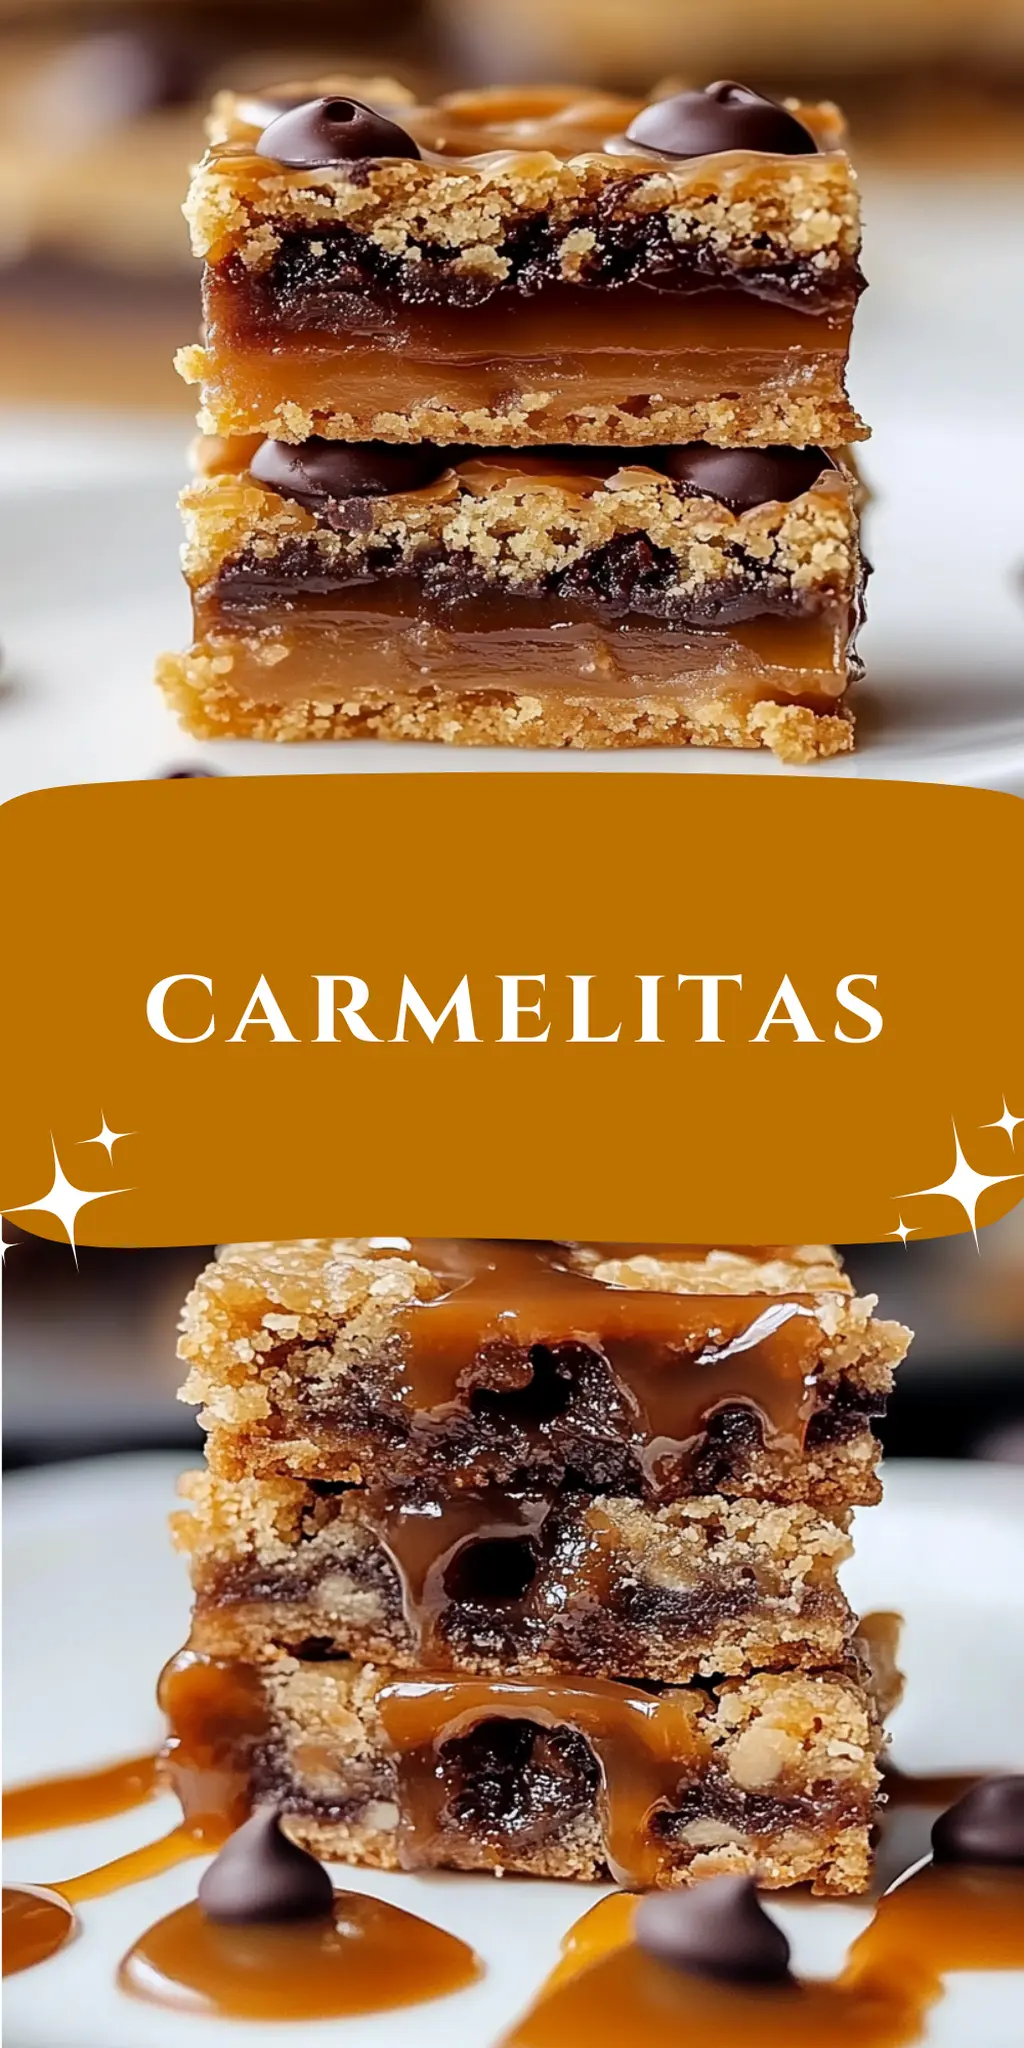
There’s nothing quite like the sweet smell of caramel wafting through your kitchen, especially when that aroma signifies the arrival of my all-time favorite treat—Carmelitas! I first stumbled upon this delightful recipe during one of those cozy afternoons when I was craving something homemade yet indulgently satisfying. The combination of soft caramel and rich chocolate nestled between a buttery oat crust makes these beauties irresistible.

Picture this: crispy on the outside, gooey in the middle, and every bite bursting with flavor. They’re perfect for a weekend treat or even as a go-to dessert for gatherings. Plus, the ease of preparation means you can whip them up without any fuss!
Whether you’re a seasoned chef or someone simply bored with fast food, these Carmelitas are sure to bring a smile to your face—simple to make yet impressively scrumptious. Ready to dive into the decadence? Let’s get started!
Why You'll Love This Carmelitas
- These Carmelitas are incredibly easy to make, allowing you to indulge in a homemade treat without complicated steps.
- The rich combination of caramel and chocolate provides a mouthwatering flavor that will leave everyone craving more.
- Their versatility means they are perfect for any occasion, whether it’s a casual family gathering or a festive holiday party.
- Plus, the stunning visual appeal of the layered goodness will impress your guests and make your dessert table pop.
- Enjoy a delicious dessert that is guaranteed to please a crowd and satisfy your sweet tooth all at once.
Carmelitas Ingredients
• Get ready to create a sweet masterpiece!
For the Base
- 3/4 cup butter – melted for that rich, buttery flavor.
- 3/4 cup light brown sugar – packed for a delightful caramel undertone.
- 1 tablespoon vanilla extract – adds depth and warmth to your Carmelitas.
- 1 cup all-purpose flour – gives structure to the base.
- 1 cup old-fashioned rolled oats – adds a hearty texture and chewiness.
- 1 teaspoon baking soda – ensures a light, airy bake.
- 1 teaspoon salt, divided – balances the sweetness perfectly.
For the Caramel Layer
- 35-40 soft caramel candies – unwrapped to melt into a gooey layer of deliciousness.
- 1/2 cup heavy cream – creates a luscious, silky caramel sauce.
For the Topping
- 1 cup semi-sweet chocolate chips – provides a rich chocolatey contrast to the caramel.
These ingredients come together to create the perfect blend of sweetness and texture in your Carmelitas!
How to Make Carmelitas
-
Preheat the oven to 350°F (175°C) and prepare an 8×8 inch baking pan by lining it with parchment paper for easy removal. This ensures that your Carmelitas come out beautifully!
-
Melt the butter in a large mixing bowl, then stir in the packed brown sugar and vanilla extract until combined. The mixture should be smooth and creamy, creating a lovely base for your treats.
-
Combine the flour, oats, baking soda, and 1/2 teaspoon of salt into the buttery mixture. Mix until a thick dough forms, which will serve as the delicious crust for your Carmelitas.
-
Press half of the dough evenly into the prepared baking pan and bake for 10 minutes. You want to achieve a light golden color that gives way to a soft, chewy base for all that gooey goodness!
-
Melt the caramel candies and heavy cream together in a saucepan over medium heat, stirring constantly until smooth. Don’t forget to mix in the remaining salt—it enhances the flavors wonderfully!
-
Sprinkle chocolate chips over the baked crust. Then, pour the melted caramel sauce evenly on top, and crumble the remaining dough over it. This layering is what makes each bite so decadently delicious!
-
Bake for an additional 15-18 minutes, until the edges are nicely browned and the center is bubbly. The exciting aroma will fill your kitchen, and your patience will soon be rewarded!
-
Cool completely for at least 4 hours on a wire rack. Once cooled, lift the entire block from the pan using the parchment paper and slice it into squares.
Optional: Drizzle with extra caramel sauce for an added touch of indulgence!
Exact quantities are listed in the recipe card below.
Carmelitas Variations
Feel free to get creative with your Carmelitas by trying these delicious twists that add unique flavors and textures!
-
Nutty Delight: Add 1/2 cup chopped nuts such as pecans or walnuts to the crust for a crunchy texture contrast. The nutty flavor pairs wonderfully with the caramel and chocolate!
-
Gluten-Free: Substitute all-purpose flour with a gluten-free flour blend for a delightful treat that everyone can enjoy. You won’t miss the gluten with these rich flavors!
-
Spicy Kick: Sprinkle a pinch of cayenne pepper or chili powder into the caramel mixture for a subtle heat that balances the sweetness beautifully. It’s a tasty surprise for those who love a little spice!
-
Fruit Infusion: Incorporate 1/2 cup of dried fruits like cranberries or cherries into the filling for a fruity twist that adds a burst of flavor. This brings a wonderful chewiness to each bite!
-
Peanut Butter Swirl: Drizzle 1/2 cup of melted peanut butter over the caramel before adding the chocolate chips for a creamy, nutty flavor. Peanut butter and chocolate are a match made in heaven!
-
Coconut Flakes: Mix in 1/2 cup of unsweetened shredded coconut into the dough or sprinkle it on top before baking for a tropical flair. The coconut adds a lovely texture and flavor that enhances the overall experience.
-
Dairy-Free: Use coconut milk in place of heavy cream and swap the butter for coconut oil to create a deliciously dairy-free version. It’s indulgent and still works wonderfully with the other flavors!
-
Mint Chocolate: Stir in 1 teaspoon of peppermint extract into the caramel sauce for a refreshing minty treat. Topped with dark chocolate chips, this variation is perfect for the holidays or any mint lover!
What to Serve with Carmelitas?
Imagine a warm gathering with friends, laughter echoing as the sweet aroma of caramel dances in the air, inviting everyone to indulge in this delightful treat.
-
Vanilla Ice Cream: A scoop of creamy vanilla ice cream adds a cool contrast to the warm, gooey Carmelitas, making each bite a heavenly experience.
-
Fresh Berries: Juicy strawberries or blueberries offer a tart freshness that balances the rich sweetness, creating a well-rounded dessert plate.
-
Coffee or Espresso: A rich, robust coffee pairs nicely, cutting through the sweetness while enhancing the overall flavors of the Carmelitas—a perfect match for coffee lovers.
-
Chocolate Drizzle: Elevate your Carmelitas with a drizzle of melted chocolate on top for an extra touch of indulgence, deepening that decadent chocolate flavor.
-
Caramel Sauce: Serve with a side of warm caramel sauce for dipping, allowing guests to customize their experience with an extra layer of gooey goodness.
-
Nutty Topping: Toasted pecans or walnuts sprinkled on top add a lovely crunch and nutty flavor that contrasts beautifully with the soft caramel and chewy oats.
-
Hot Cocoa: Nothing warms the heart quite like a cup of homemade hot cocoa alongside your Carmelitas, creating a comforting and nostalgic pairing.
These thoughtful pairings will make your sweet treat truly shine, turning any occasion into a celebration.
Make Ahead Options
These Carmelitas are a fantastic choice for meal prep, allowing you to enjoy their gooey richness without the last-minute rush! You can prepare the dough and layer it in the baking pan up to 24 hours in advance; simply cover it tightly with plastic wrap and refrigerate. If you’d like, you can also melt the caramel and heavy cream mixture ahead of time—just store it in an airtight container for up to 3 days. When you’re ready to serve, pour the caramel over the crust, sprinkle with chocolate chips, and crumble the remaining dough on top before baking. This way, you maintain that delightful texture and flavor, ensuring your treats are just as delicious when they come out of the oven!
Storage Tips for Carmelitas
Room Temperature: Keep your Carmelitas in an airtight container at room temperature for up to 3 days. They’ll stay soft and gooey, perfect for snacking!
Fridge: For longer freshness, store Carmelitas in the fridge where they can last up to a week. Make sure they’re in a sealed container to prevent them from drying out.
Freezer: If you want to enjoy Carmelitas later, freeze them for up to 3 months. Wrap individually in plastic wrap and then in foil, or store in a freezer-safe container.
Reheating: To enjoy your frozen Carmelitas, simply let them thaw in the fridge overnight, or microwave for a few seconds until warm. The caramel will be gooey, just like fresh!
Chef's Helpful Tips
- When making Carmelitas, ensure that your butter is truly melted but not too hot, as this can affect the final texture of the dough.
- A common mistake is overmixing the dough; mix just until combined to maintain its thickness and chewiness.
- When melting the caramel and heavy cream, stir constantly over medium heat to prevent burning and achieve a silky smooth sauce.
- For best results, allow your Carmelitas to cool completely before slicing; this ensures clean cuts and helps the layers set properly.
Carmelitas Recipe FAQs
How do I choose the best caramel candies for Carmelitas?
Absolutely! When selecting caramel candies, look for soft varieties, such as Kraft caramels or Werther’s Original. These melt beautifully and create a luscious filling. Avoid hard or chewy types that may not blend well into a smooth sauce.
How should I store leftover Carmelitas?
Very! You can keep your leftover Carmelitas in an airtight container at room temperature for up to 3 days. For longer freshness, I recommend storing them in the fridge where they can last up to a week without losing their delicious gooeyness.
Can I freeze Carmelitas?
Absolutely! To freeze your Carmelitas, wrap each square tightly in plastic wrap and place them in a freezer-safe bag or container. This allows them to keep for up to 3 months. When you’re ready to indulge, just thaw them in the fridge overnight and pop them in the microwave for a few seconds to restore their delightful softness.
What should I do if my Carmelitas are too crumbly?
If you find your Carmelitas are crumbling apart, it’s likely due to insufficient binding from the caramel layer. To troubleshoot, ensure you’re using enough caramel and cream. If you end up with a dry mixture, consider adding a touch more melted butter to the crust dough next time or even a splash of cream to help it hold together better.
Are Carmelitas safe for pets or people with allergies?
It’s important to be cautious! Carmelitas contain ingredients like chocolate and caramel that can be harmful to pets. Additionally, if you or anyone you are serving has allergies, be sure to check for common allergens in your ingredients like dairy or gluten, especially since the recipe calls for butter and flour. Always feel free to adapt the recipe using alternatives like vegan butter or gluten-free flour if needed!
How long should I let Carmelitas cool before cutting?
Great question! It’s crucial to be patient and allow your Carmelitas to cool completely for at least 4 hours. This cooling time helps the layers set properly, making them easier to lift from the pan and slice into perfectly squared treats without falling apart.
Carmelitas
Ingredients
Equipment
Method
- Preheat your oven to 350°F and prepare an 8×8 inch baking pan by lining it with parchment paper.
- Melt the butter in a mixing bowl. Stir in the packed light brown sugar until well combined, followed by the vanilla extract.
- Combine the flour, oats, baking soda, and 1/2 teaspoon of salt into the melted butter mixture. Mix until a thick dough forms.
- Press half of the dough evenly into the prepared baking pan. Bake for about 10 minutes or until lightly golden.
- Melt the caramel candies and heavy cream together in a saucepan over low heat, stirring continuously until smooth.
- Sprinkle chocolate chips over the baked crust, pour the warm caramel sauce on top, and crumble the remaining dough over it.
- Bake for an additional 15-18 minutes until brown and bubbly. Cool completely for at least 4 hours before slicing.