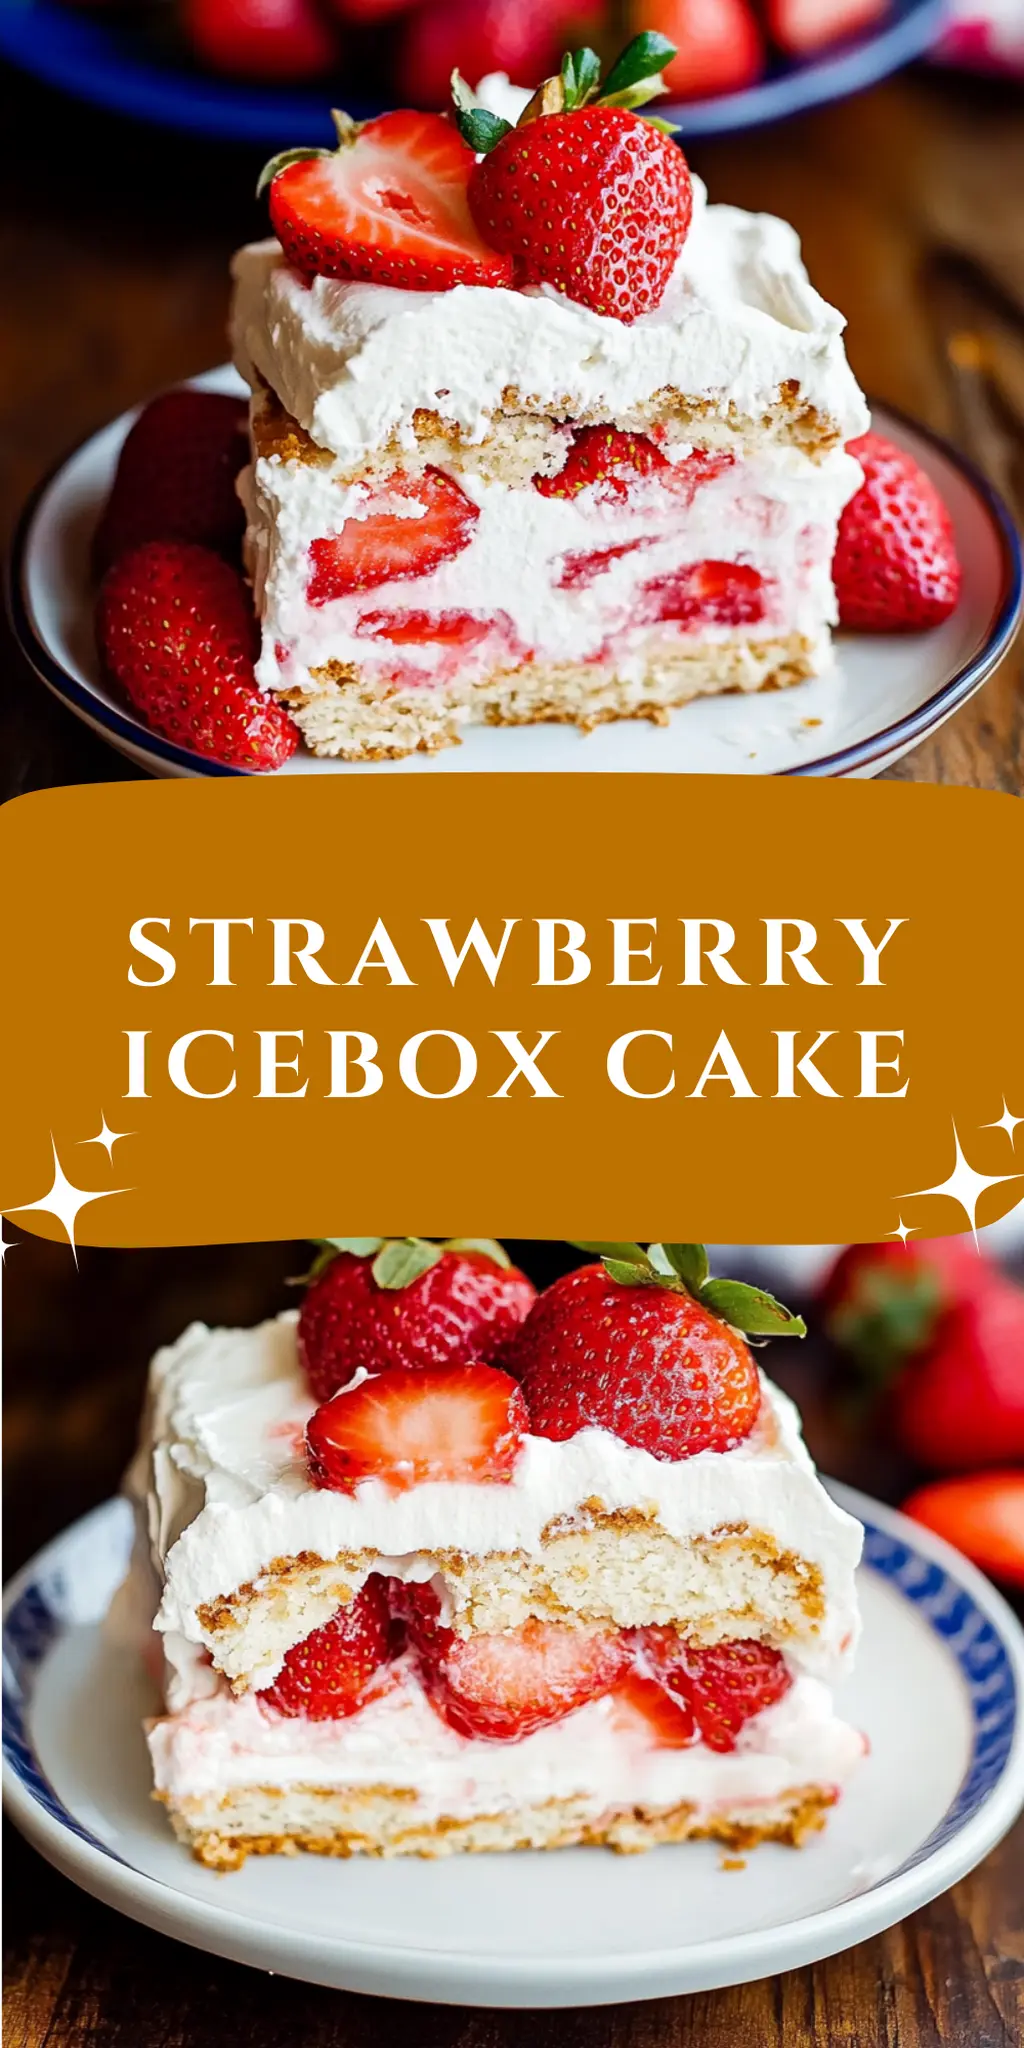
When the sun starts shining a little brighter and the days linger longer, I find myself craving something light and refreshing. That’s when a delicious Strawberry Icebox Cake comes to mind—a dessert that’s not just easy to whip up but also a true crowd-pleaser. Imagine layers of creamy, fluffy goodness combined with the sweet tartness of fresh strawberries, all cradled between crispy Nilla Wafers.
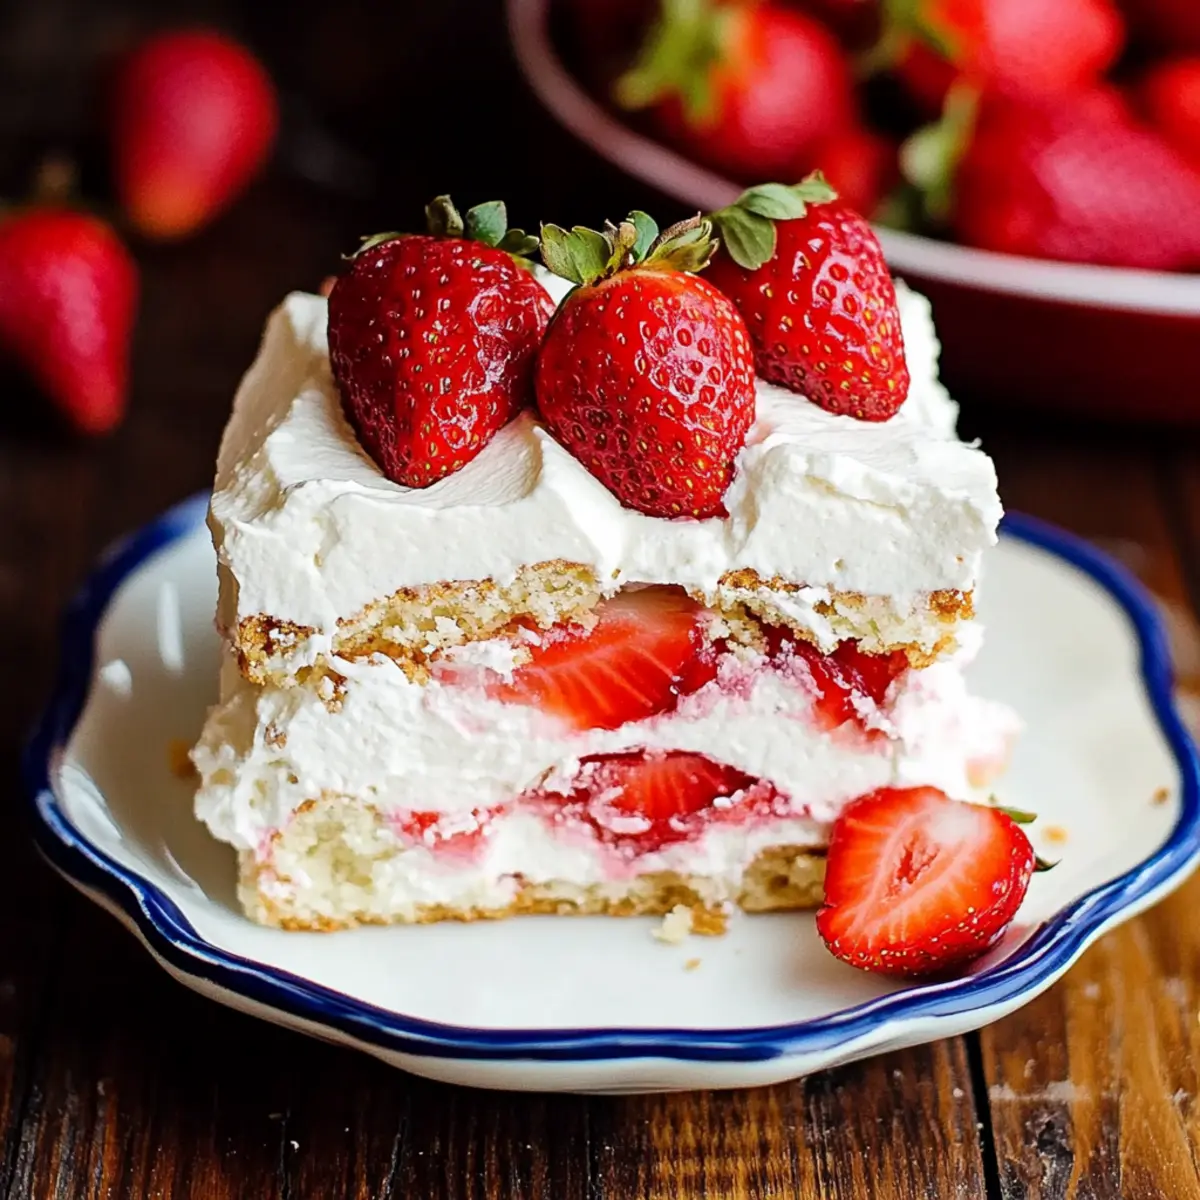
This cake isn’t just a treat for the taste buds; it invokes nostalgia too. I can’t help but think of summer picnics and family gatherings when creamy desserts take center stage. The best part? It only takes a quick 30 minutes of prep time, and the magic happens while it chills in the refrigerator, giving you more time to enjoy your sunny afternoons or catch up on a good book. Trust me, this Strawberry Icebox Cake is the perfect twist on classic comfort, and your taste buds will thank you for this refreshing delight!
Why You'll Love This Strawberry Icebox Cake
- This Strawberry Icebox Cake is incredibly easy to make, requiring just 30 minutes of prep time which means less time in the kitchen and more time enjoying your summer days.
- The combination of creamy filling, fresh strawberries, and crispy Nilla Wafers creates an explosion of flavor that you and your guests will absolutely adore.
- Its versatility allows you to serve it at any gathering, from casual barbecues to elegant dinner parties, making it a true crowd-pleaser.
- Plus, the stunning layers of strawberries and whipped cream make for a visually appealing dessert that will impress everyone at the table.
Strawberry Icebox Cake Ingredients
• Get ready for a fruity delight!
For the Cream Filling
- Cream Cheese – 8 ounces, softened for easy blending, creating the perfect creamy base.
- Powdered Sugar – ½ cup is ideal for sweetness without the grit, ensuring a smooth texture.
- Vanilla Extract – 1 teaspoon adds a warm, inviting flavor that enhances all the ingredients.
- Cold Heavy Whipping Cream – 1 cup to whip into airy peaks, giving the cake its delightful fluffiness.
For the Layers
- Fresh Strawberries – 2 pounds, hull and slice them for a juicy burst in every layer of your Strawberry Icebox Cake.
- Nilla Wafers – 1 (11-ounce) box to build a crispy, contrasting texture that holds it all together.
For the Topping
- Whipped Cream or Cool Whip – Add more for a light finish, offering an extra layer of luscious creaminess before serving.
How to Make Strawberry Icebox Cake
-
Beat cream cheese until smooth. In a large mixing bowl, start by beating the cream cheese until it reaches a creamy consistency, about 2 minutes. This will form a tasty base for your filling.
-
Mix in powdered sugar and vanilla extract. Gradually add in ½ cup of powdered sugar and 1 teaspoon of vanilla extract, mixing until everything is well incorporated and fluffy. This step brings sweetness and a delightful aroma to your cream filling.
-
Add cold heavy whipping cream. Pour in 1 cup of cold heavy whipping cream, then whip the mixture until peaks form—this usually takes about 3-5 minutes. You want the mixture to be light and airy, which will create that heavenly texture.
-
Layer Nilla Wafers in a pan. Take your 9×9-inch pan and add a layer of Nilla Wafers to the bottom, completely covering the base for that perfect crunch.
-
Spread strawberries and cream mixture. Add a layer of sliced strawberries on top of the wafers, then spread a generous portion of your cream cheese mixture over the strawberries. This layer is where the magic begins!
-
Repeat layering until finished. Continue the process, alternating between layers of Nilla Wafers, strawberries, and cream mixture until you run out, ensuring to end with the cream on top.
-
Chill in the refrigerator. Cover the pan with plastic wrap and chill in the refrigerator for a minimum of 4 hours, or overnight for the best flavor. This chilling time lets the layers meld beautifully.
-
Top with whipped cream and strawberries. Once chilled, before serving, add a dollop of whipped cream and some fresh sliced strawberries on top to create a stunning finish.
Optional: Add a drizzle of chocolate sauce for a delicious twist!
Exact quantities are listed in the recipe card below.
Strawberry Icebox Cake Variations
Feel free to make this Strawberry Icebox Cake your own with these fun twists and swaps!
-
Dairy-Free: Substitute cream cheese with a dairy-free alternative and use coconut cream instead of heavy whipping cream for a tropical vibe.
-
Gluten-Free: Switch out Nilla Wafers for gluten-free wafers or even homemade gluten-free cookies, ensuring everyone can enjoy this treat.
-
Berry Medley: Instead of just strawberries, mix in raspberries and blueberries for a vibrant burst of color and flavor that says summer!
-
Chocolate Lovers: Fold in cocoa powder to the cream filling or layer in chocolate graham crackers for a delightful twist on the classic.
-
Citrus Zest: Add a tablespoon of lemon or orange zest to the cream mixture to enhance flavors and provide a refreshing zing that brightens every bite.
-
Nutty Delight: Incorporate crushed nuts like almonds or walnuts into the creamy filling for added texture and a delightful crunch.
-
Spicy Kick: Drizzle a little sriracha or sprinkle cayenne pepper into the cream for an unexpected flavor twist that plays off the sweetness wonderfully.
-
Frozen Treat: Try freezing the assembled cake for an ice cream cake sensation—slice and freeze for a refreshing summer dessert!
Make Ahead Options
These Strawberry Icebox Cakes are ideal for those busy days when you want to prepare something refreshing without spending hours in the kitchen! You can make the cream filling and layer the Nilla Wafers with strawberries up to 24 hours in advance. Simply prepare the cake, cover it tightly with plastic wrap, and refrigerate. This allows the flavors to meld beautifully while keeping the Nilla Wafers crisp. When you’re ready to serve, just add the whipped cream on top and garnish with fresh strawberries. This way, you’ll present a stunning dessert that tastes just as delicious even after a night’s chilling!
How to Store and Freeze Strawberry Icebox Cake
Fridge: Keep the Strawberry Icebox Cake covered in plastic wrap or stored in an airtight container for up to 3 days. This helps maintain freshness and texture.
Freezer: You can freeze individual slices for up to 2 months. Wrap them tightly in plastic wrap, then place them in a freezer-safe bag to prevent freezer burn.
Thawing: To enjoy, simply place the cake in the fridge for several hours or overnight to thaw. Avoid microwaving, as it may compromise the texture of the layers.
Reheating: This dessert is best enjoyed cold but if you prefer a warmer version, serve it slightly chilled straight from the fridge for an inviting treat!
What to Serve with Strawberry Icebox Cake?
Imagine gathering around the table with friends and family, savoring a meal that complements the light, refreshing essence of your Strawberry Icebox Cake.
-
Grilled Chicken Salad: Crisp greens and marinated grilled chicken create a perfect contrast to the sweetness of the cake, adding a savory touch.
-
Garlic Bread: The buttery, garlic-infused crunch provides a delightful texture that balances the creamy, fruity dessert wonderfully.
-
Fresh Fruit Platter: A selection of seasonal fruits enhances the dessert’s fruity flavors, providing fresh bites that entice your palate.
-
Lemonade Fizz: This bubbly drink cuts through the richness of the icebox cake, refreshing each bite with its zesty sparkle and sweetness.
-
Chocolate-Dipped Strawberries: Enhance your dessert experience with these treats that amp up the strawberry flavor while adding a luxurious chocolatey note.
-
Vanilla Bean Ice Cream: This classic pairing offers a creamy melding with the chilled layers, making every bite a smooth, indulgent delight.
-
Pistachio Muffins: The nutty flavor and delightful crumb of pistachio muffins add texture and a unique twist that complements the cake perfectly.
-
Iced Tea (Sweetened or Unsweetened): A chilled glass of tea allows you to sip slowly between bites, enhancing the cake’s refreshing qualities.
-
Coconut Macaroons: With their chewy texture and subtle coconut flavor, these delightful cookies make a great accent to the sweet and creamy icebox cake.
Chef's Helpful Tips
- Make sure your cream cheese is at room temperature to achieve a smooth and lump-free filling in your Strawberry Icebox Cake.
- Always add the powdered sugar gradually to avoid clumping and ensure an evenly sweetened mixture.
- When whipping the heavy cream, stop as soon as stiff peaks form to prevent overwhipping, which can lead to a grainy texture.
- Remember to chill the cake for at least four hours, but longer is better for the flavors to meld perfectly and for a firmer texture.
Strawberry Icebox Cake Recipe FAQs
How do I select ripe strawberries for this recipe?
Absolutely! When choosing strawberries, look for vibrant red color and a sweet aroma. Avoid berries with green or white patches, as they may not be ripe. Fresh strawberries should be plump and firm, with bright green leaves—these indicate freshness!
How long can I store Strawberry Icebox Cake in the fridge?
You can keep your Strawberry Icebox Cake covered in plastic wrap or in an airtight container for up to 3 days. This will help maintain its creamy texture and fresh strawberry flavor. Enjoy it before then for the best taste!
Can I freeze Strawberry Icebox Cake?
Very much! To freeze, slice the cake into individual portions and wrap each piece tightly in plastic wrap. Then, place them in a freezer-safe bag for up to 2 months. This method ensures the cake stays fresh and ready to enjoy later, just be sure to write the date on the bag!
What’s the best way to thaw frozen Strawberry Icebox Cake?
To thaw, simply place the frozen slice in the refrigerator for several hours or overnight. This gradual thawing process helps preserve the structure and flavor of your cake. Avoid microwaving as it can make the layers mushy and lose their delightful texture.
Can I modify this recipe for dietary restrictions?
Absolutely! If you’re looking to make it gluten-free, consider using gluten-free cookies instead of Nilla Wafers. For a dairy-free version, substitute with non-dairy cream cheese and coconut whipped cream. Always check ingredients for potential allergens if you’re serving guests with specific dietary needs!
What should I do if my whipped cream doesn’t whip up properly?
If your whipped cream isn’t reaching stiff peaks, ensure your heavy whipping cream is very cold, ideally chilled for a few hours beforehand. Whipping at a medium speed and not over-mixing is essential; if you’ve overwhipped, it might turn grainy. If you notice this happening, briefly stop mixing, and slowly add in a little more cold cream, gently folding it in to bring back creaminess.
Strawberry Icebox Cake
Ingredients
Equipment
Method
- Beat cream cheese until smooth.
- Mix in powdered sugar and vanilla extract.
- Add cold heavy whipping cream.
- Layer Nilla Wafers in a pan.
- Spread strawberries and cream mixture.
- Repeat layering until finished.
- Chill in the refrigerator.
- Top with whipped cream and strawberries.