There’s something undeniably enchanting about the holiday season, isn’t there? As the days grow shorter and the air gets crisper, I find myself craving sweet, festive treats that warm the heart. That’s how I stumbled upon my absolute favorite indulgence: Pink Peppermint Christmas Ice Cream Cake. Trust me, this show-stopping dessert is as delightful to make as it is to devour!

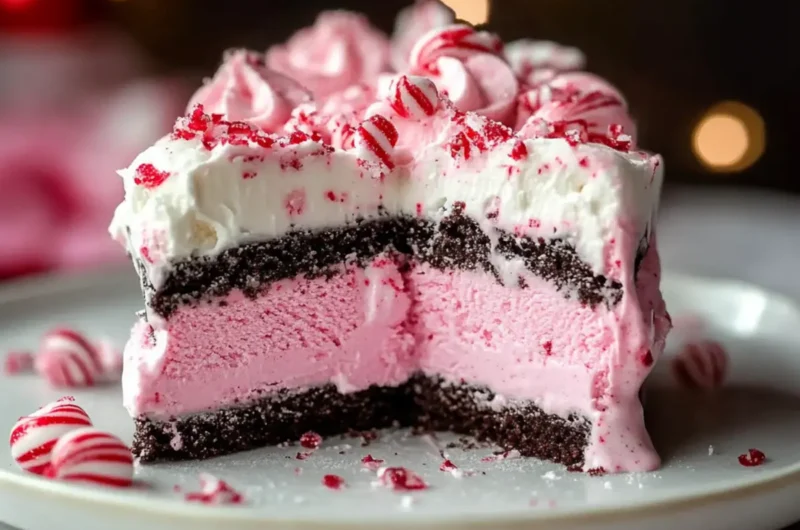
Picture this: creamy peppermint ice cream layered between a crunchy chocolate cookie crust and decadent ice cream sandwiches, all drizzled with rich melted chocolate and topped with whimsical crushed candy canes. It’s a festive treat that brings cheer to any gathering, making it perfect for holiday parties or a cozy family dessert night. Plus, it’s incredibly easy to whip up, so whether you’re a seasoned chef or someone looking to escape the fast-food rut, this cake will become a holiday tradition in your home. Let’s dive into the deliciousness!
Why You'll Love This Pink Peppermint Christmas Ice Cream Cake
- This dessert is incredibly easy to make, allowing you to create a festive masterpiece in just 30 minutes.
- The delightful combination of creamy peppermint ice cream and crunchy chocolate sandwich cookies offers a flavor explosion that will impress everyone.
- Its stunning visual appeal, with vibrant layers and a sprinkle of festive candy canes, makes it the perfect centerpiece for your holiday celebrations.
- Plus, it’s a crowd-pleaser that can easily serve a large group, making it ideal for holiday parties and family gatherings.
Pink Peppermint Christmas Ice Cream Cake Ingredients
For the Crust
- Chocolate sandwich cookies – a deliciously crunchy base that contrasts beautifully with the creamy filling.
For the Ice Cream Layers
- Peppermint ice cream – offers that refreshing wintery flavor, perfect for the holiday spirit.
- Ice cream sandwiches – adds extra layers of creamy goodness; consider using different flavored sandwiches for a twist!
For the Topping
- Milk or dark chocolate – provides a rich drizzle that elegantly ties the flavors together.
- Coconut oil – helps the chocolate melt smoothly and adds a subtle tropical hint.
- Crushed candy canes – gives a festive crunch that not only looks pretty but enhances the peppermint experience in this Pink Peppermint Christmas Ice Cream Cake!

How to Make Pink Peppermint Christmas Ice Cream Cake
-
Prepare the Dish: Start by lining a 9×13 inch dish with plastic wrap, making it easier to lift out the cake for serving later. This small step ensures smooth removal!
-
Soften the Ice Cream: Let the peppermint ice cream sit at room temperature for about 10 minutes, until it’s soft but not fully melted. This will make for easier spreading in the layers.
-
Crush the Cookies: Using a food processor or a zip-top bag and a rolling pin, crush the chocolate sandwich cookies coarsely. Aim for chunky bits for that delightful texture in the crust.
-
Form the Crust: Spread the crushed cookies evenly across the bottom of the prepared dish. Press gently to form a firm base—this crunch will perfectly complement the creamy layers above.
-
Add the First Ice Cream Layer: Spoon the softened peppermint ice cream over the cookie crust, spreading it out evenly. Aim for about 1 inch thick—it should look inviting and cozy!
-
Layer the Ice Cream Sandwiches: Place the classic rectangular ice cream sandwiches on top of the peppermint layer, ensuring they cover the surface completely. This adds a creamy, delicious dimension to your cake.
-
Spread the Second Layer: Top the ice cream sandwiches with another layer of softened peppermint ice cream, smoothing it out to create an enticing finish. Pop it in the freezer for at least 4 hours, until firm.
-
Melt the Chocolate: In a microwave-safe bowl, combine the milk or dark chocolate and coconut oil. Melt together in 30-second increments, stirring until smooth and glossy—so tempting!
-
Drizzle and Decorate: Remove the cake from the freezer, drizzle the melted chocolate generously over the top, and sprinkle with crushed candy canes. This festive touch is sure to impress!
-
Slice and Serve: Take your time cutting into this beauty for perfectly layered slices. Enjoy the cheers of delight as you serve this Pink Peppermint Christmas Ice Cream Cake!
Optional: Garnish with extra crushed candy canes for an extra festive touch.
Exact quantities are listed in the recipe card below.
What to Serve with Pink Peppermint Christmas Ice Cream Cake?
As you revel in the delight of your festive creation, consider these perfect pairings to amplify your holiday gatherings.
-
Warm Chocolate Fondue: This rich and gooey addition offers an indulgent contrast, inviting delightful dippings with strawberries or marshmallows. Perfect for cozy get-togethers!
-
Whipped Cream: A simple dollop of freshly whipped cream adds lightness and enhances the creamy layers of the cake, making each bite heavenly.
-
Holiday Fruit Salad: A refreshing blend of seasonal fruits like pomegranates, citrus, and berries balances the sweetness of the cake, ensuring a complete meal experience.
-
Hot Cocoa Bar: Set up a DIY hot cocoa station with toppings like marshmallows and sprinkles. The warm beverage will complement the cool cake beautifully, creating that comforting holiday vibe.
-
Festive Cookies: Pair your cake with a tray of assorted holiday cookies; dense gingerbread or crispy sugar cookies add delightful crunch and flavor variety.
-
Spiced Eggnog: For an adult twist, serve a glass of spiced eggnog alongside. Its creamy texture and nutmeg flavors marry wonderfully with the peppermint notes.
This Pink Peppermint Christmas Ice Cream Cake is not just a dessert; it’s an invitation to celebrate love, joy, and delicious moments.
How to Store and Freeze Pink Peppermint Christmas Ice Cream Cake
Fridge: Keep any sliced portions in an airtight container for up to 3 days to maintain freshness. This way, you can enjoy a festive treat throughout the week!
Freezer: For long-term storage, wrap the whole cake tightly in plastic wrap and aluminum foil. It will stay delicious for up to 2 months in the freezer, so it’s great for holiday planning!
Reheating: There’s no need to reheat this ice cream cake; simply remove it from the freezer and let it sit at room temperature for about 10 minutes before serving. Enjoy the smooth, creamy texture!
Serving: If you have leftover portions, just slice and place them back in the freezer promptly. The Pink Peppermint Christmas Ice Cream Cake is best enjoyed frozen, so keep it chilly!
Make Ahead Options
These delightful Pink Peppermint Christmas Ice Cream Cake layers are perfect for meal prep enthusiasts looking to save time during the busy holiday season! You can prepare the chocolate sandwich cookie crust and layer the peppermint ice cream up to 24 hours in advance, store it in the freezer, and ensure it maintains its fabulous texture. For best results, after spreading the ice cream sandwiches, cover and freeze it right away. When you’re ready to serve, simply drizzle the melted chocolate on top and sprinkle with crushed candy canes—this last-minute touch keeps it looking festive and delicious. Enjoy the ease of having your dessert almost ready, allowing you more time to celebrate with loved ones!
Pink Peppermint Christmas Ice Cream Cake Variations
Feel free to make this festive dessert your own with these fun and delicious twists!
-
Dairy-Free: Substitute peppermint ice cream with a coconut or almond-based peppermint ice cream for a completely dairy-free delight. This will keep the creamy texture while catering to those with dietary restrictions.
-
Chocolate Cookie Swap: Use gingerbread or vanilla sandwich cookies instead of chocolate for a seasonal flair—sweet, spicy, and oh-so-delicious!
-
Layered Flavors: Incorporate flavors like chocolate mint or vanilla ice cream between the layers for an exciting twist. Each bite can offer a unique taste experience!
-
Nutty Crunch: Add chopped walnuts or pecans to the crushed cookie crust for an earthy crunch. These nuts not only enhance texture but also deepen the flavor profile.
-
Fruity Fun: Why not fold in some crushed berries or cherries into the peppermint ice cream? Fresh fruit bursts add a delightful contrast to the rich layers.
-
Spicy Kick: Sprinkle a bit of cinnamon or nutmeg in the chocolate drizzle for a warm spice that complements the peppermint beautifully. It’s like autumn in a winter dessert!
-
Healthier Option: Use sugar-free ice cream and chocolate for a lighter version. You can indulge without the guilt while maintaining that festive charm!
-
Choco-Mint Drizzle: Swap out the top chocolate drizzle with a mint chocolate ganache for an extra layer of decadence. The minty richness will make every slice irresistible!
Chef's Helpful Tips
- When making the Pink Peppermint Christmas Ice Cream Cake, ensure you let the peppermint ice cream soften just enough to spread easily without turning into a puddle.
- Avoid over-crushing the chocolate sandwich cookies; aim for a coarse texture to maintain some crunch in the crust.
- When layering the ice cream sandwiches, press them down gently for better adhesion to the layers above and to ensure an even slice later on.
- Allow the cake to freeze for at least 4 hours, but for best results, overnight is ideal to achieve the right firmness before drizzling with chocolate.
Pink Peppermint Christmas Ice Cream Cake Recipe FAQs
What type of peppermint ice cream should I use?
You can use any brand of peppermint ice cream that you love! Look for ice creams that are rich and creamy, with real peppermint flavor. Some brands even offer a twist, like chocolate peppermint, which can add an exciting depth to your Pink Peppermint Christmas Ice Cream Cake.
How should I store leftovers?
Keep any leftover slices in an airtight container in the fridge for up to 3 days. For longer storage, wrap the entire cake tightly in plastic wrap and aluminum foil and freeze it for up to 2 months. This way, you can savor a delightful slice any time the holiday craving hits!
Can I freeze the Pink Peppermint Christmas Ice Cream Cake?
Absolutely! Follow these steps:
- Once fully assembled, wrap the cake tightly in plastic wrap to prevent freezer burn.
- Then, cover it with aluminum foil for extra protection.
- Freeze it for up to 2 months.
When you’re ready to enjoy it, just let it sit out for about 10 minutes before slicing to achieve the perfect texture.
What if my chocolate melts too quickly?
If you find that your chocolate is melting too fast, it could be due to the microwave temperature. Melt it in 30-second increments, stirring in between, to maintain control over the melting process. Adding coconut oil helps it become glossy and smooth while preventing it from seizing. Keep stirring until it’s perfectly melted and ready to drizzle!
Is this recipe safe for pets?
While the Pink Peppermint Christmas Ice Cream Cake is a delightful treat for humans, it may not be suitable for pets. Chocolate is toxic to dogs and cats, so ensure they don’t sneak a bite into their holiday fun. Always keep your festive desserts well out of their reach!
Pink Peppermint Christmas Ice Cream Cake
Ingredients
Equipment
Method
- Start by lining a 9×13 inch dish with plastic wrap, making it easier to lift out the cake for serving later.
- Let the peppermint ice cream sit at room temperature for about 10 minutes, until it’s soft but not fully melted.
- Using a food processor or a zip-top bag and a rolling pin, crush the chocolate sandwich cookies coarsely.
- Spread the crushed cookies evenly across the bottom of the prepared dish. Press gently to form a firm base.
- Spoon the softened peppermint ice cream over the cookie crust, spreading it out evenly.
- Place the ice cream sandwiches on top of the peppermint layer, ensuring they cover the surface completely.
- Top the ice cream sandwiches with another layer of softened peppermint ice cream and smooth it out.
- In a microwave-safe bowl, combine the milk or dark chocolate and coconut oil. Melt together in 30-second increments, stirring until smooth.
- Remove the cake from the freezer, drizzle the melted chocolate generously over the top, and sprinkle with crushed candy canes.
- Take your time cutting into this beauty for perfectly layered slices and serve.