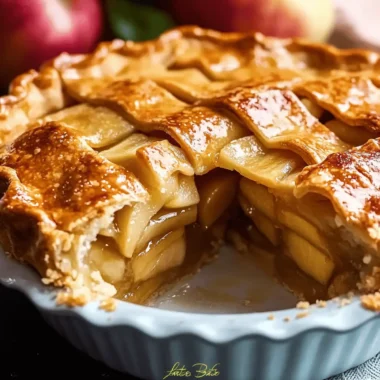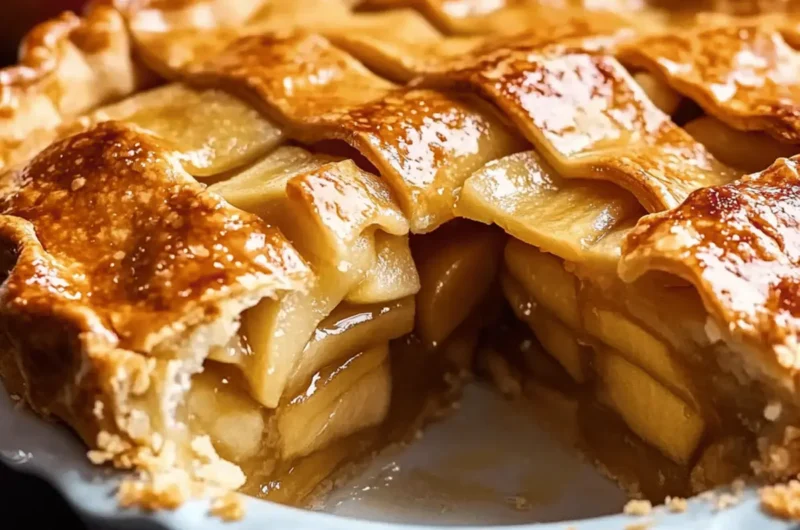
There’s something wonderfully nostalgic about the scent of a freshly baked pie wafting through the kitchen, especially when it involves the classic Flaky Apple Pie. Picture this: the moment you pull it from the oven, the golden crust just begging to be sliced, and the sweet, spiced aroma enveloping the room, beckoning everyone to gather around. This pie doesn’t just look beautiful; it’s a delightful warm hug for the soul, a celebration of tart Granny Smith apples and the sweetness of Honeycrisp drizzled with a hint of cinnamon and nutmeg.

I discovered my love for apple pie during cozy family gatherings, where sharing a slice brought smiles and stories to life. Now, instead of relying on takeout, I’ve made it my mission to recreate that joy at home. With just a few simple ingredients, this Flaky Apple Pie is surprisingly easy to make, proving that you don’t need to be a seasoned chef to deliver exceptional flavors that leave everyone wanting more. Let’s roll up our sleeves and bring a slice of happiness to your table!
Why You'll Love This Flaky Apple Pie
- This Flaky Apple Pie is incredibly easy to make, allowing even novice bakers to impress their friends and family with a homemade dessert.
- The combination of tart Granny Smith and sweet Honeycrisp apples creates a flavor explosion that is both comforting and refreshing.
- With its versatile filling and adaptable crust, you can customize this pie to suit any occasion or personal taste.
- The stunning golden crust and bubbling filling make for a visually appealing centerpiece that will have everyone rushing to the table.
Flaky Apple Pie Ingredients
For the Crust
- All-purpose flour – gives the pie its structure; make sure it’s measured correctly.
- Unsalted butter – cold and cubed for that perfect flaky texture.
- Ice water – helps bind the dough without melting the butter; adjust for consistency.
- Salt – enhances the overall flavor of the crust; don’t skip this step!
For the Filling
- Apples – a mix of Granny Smith and Honeycrisp adds the perfect sweet-tart balance.
- Granulated sugar – sweetens the apples; adjust based on your sweetness preference.
- Light brown sugar – adds a hint of caramel flavor to the filling.
- All-purpose flour – thickens the filling and keeps it from becoming runny.
- Lemon juice – brightens and balances the flavors while preventing browning.
- Cinnamon – adds warmth and depth; a must for a classic apple pie taste.
- Nutmeg – offers an aromatic sweetness that complements the cinnamon.
- Salt – a pinch brings out the flavors in the filling.
For Finishing
- Unsalted butter – dot on top of the filling to enhance richness as it bakes.
- Egg – brushed on for a beautiful golden crust.
- Milk or cream – adds richness to the egg wash for a shiny finish.
- Coarse sugar (optional) – sprinkle on top for a delightful crunch and sweetness.
With these ingredients in your pantry, you’re all set to create a magical Flaky Apple Pie that will remind everyone why homemade is always better than fast food!

How to Make Flaky Apple Pie
-
Prepare the Crust: In a large bowl, combine flour and salt. Cut in the cold butter until the mixture resembles coarse crumbs. Gradually add ice water until the dough forms. Divide the dough and chill for at least 1 hour.
-
Mix the Filling: Toss the sliced apples with lemon juice, both sugars, flour, cinnamon, nutmeg, and a pinch of salt. Let the mixture sit for 20 minutes to develop those delicious flavors.
-
Roll Out the Dough: Roll out one chilled dough disc into a 12-inch circle. Carefully fit it into a 9-inch pie dish. Roll the second disc to create your top crust or a lovely lattice.
-
Assemble the Pie: Fill the pie shell with the apple mixture, and dot the top with butter for extra richness. Cover with the top crust, crimp the edges, and cut vents or weave a lattice for that classic touch.
-
Brush and Sprinkle: Brush the top with the beaten egg and milk mixture for a gorgeous golden finish. If you like, sprinkle coarse sugar over the top for added sweetness and crunch.
-
Bake the Pie: Bake at 400°F (200°C) for 20 minutes, then reduce the temperature to 375°F (190°C) and bake for another 35–40 minutes, until the crust is golden brown and the filling is bubbling with joy.
-
Cool and Serve: Let the pie cool on a wire rack for at least 2 hours before slicing. This helps the filling set nicely for the perfect slice!
Optional: Serve with a scoop of vanilla ice cream for an extra treat!
Exact quantities are listed in the recipe card below.
What to Serve with Flaky Apple Pie?
Imagine the laughter of loved ones and the warm aroma of baked apples filling your home as you prepare a delightful meal that pairs perfectly with this charming pie.
- Vanilla Ice Cream: The creamy sweetness of ice cream contrasts beautifully with the warm, spiced apple filling, creating a classic dessert duo.
- Caramel Sauce: Drizzling warm caramel over each slice adds an indulgent touch, enhancing the pie’s sweetness and richness.
- Whipped Cream: Light and fluffy, a dollop of freshly whipped cream balances the pie’s spices while adding a delightful fluffiness.
- Cheddar Cheese: This unique pairing of sharp cheddar with sweet apple pie complements the flavors, offering a delightful mix of savory and sweet.
- Coffee: A rich cup of coffee complements the pie’s sweetness and brings warmth, making dessert even more comforting.
- Apple Cider: Serving hot apple cider alongside brings out the pie’s flavors, perfect for autumn gatherings and cozy evenings.
- Fruit Salad: A refreshing fruit salad made with berries and citrus provides a bright, fresh contrast to the richness of the pie.
- Chai Tea: The spiced, aromatic flavors of chai tea pair beautifully with the warming spices in the pie, enhancing the experience.
- Chocolate Drizzle: A light dusting of chocolate on top creates an elegant finish that adds both sweetness and richness to each bite.
How to Store and Freeze Flaky Apple Pie
Room Temperature: Store your Flaky Apple Pie at room temperature for up to 2 days, loosely covered with foil or wax paper to maintain crust texture.
Fridge: For longer freshness, keep the pie in the fridge for up to 5 days. Cover it with plastic wrap or place it in an airtight container to prevent drying out.
Freezer: You can freeze your Flaky Apple Pie for up to 3 months. Wrap it tightly in plastic wrap and aluminum foil to avoid freezer burn. Bake from frozen, adding extra baking time.
Reheating: To reheat, place slices in the oven at 350°F (175°C) for about 15-20 minutes, or until warmed through and the crust is crispy again. Enjoy the comfort all over again!
Flaky Apple Pie Variations
Feel free to let your creativity shine as you explore these delightful twists!
-
Gluten-Free: Substitute all-purpose flour with a 1:1 gluten-free blend for a fantastic gluten-free crust everyone can enjoy.
-
Sweetener Swap: Use maple syrup or honey in place of granulated sugar for a natural sweetness that brings a unique flavor profile to your pie.
-
Spice Up: Add a pinch of cardamom or ginger to the filling for an inviting warmth that will surprise and delight each bite.
-
Nutty Crunch: Incorporate chopped walnuts or pecans into the filling for an extra textural contrast and nutty, savory notes that complement the apples.
-
Berry Blend: Mix in a cup of fresh or frozen berries like blueberries or raspberries for a tantalizing fruit medley that adds vibrant color and juicy goodness.
-
Caramel Drizzle: Swirl in some caramel sauce with the apple filling for an indulgent twist that will elevate your pie to heavenly heights.
-
Vegan Option: Replace butter with coconut oil or vegan butter and substitute the egg wash with a plant-based milk for a completely vegan-friendly pie.
-
Citrus Zest: Add the zest of an orange or lemon to the filling for a refreshing zing that brightens the overall flavor, creating a beautiful contrast with the apples.
Make Ahead Options
These Flaky Apple Pies are perfect for meal prep enthusiasts! You can prepare the pie dough and filling up to 24 hours ahead of time, ensuring a quick assembly on a busy day. Simply prepare the crust, divide it into discs, and wrap tightly in plastic wrap before refrigerating. For the filling, toss the sliced apples with lemon juice, sugars, and spices, then store it in an airtight container. To maintain quality, keep both components in the refrigerator and assemble just before baking. When you’re ready to enjoy, roll out the dough, fill it with the prepared mixture, and follow the baking instructions for a delightful dessert that feels just like homemade without the last-minute rush!
Chef's Helpful Tips
- To achieve the perfect Flaky Apple Pie crust, ensure your butter is very cold and cut it into the flour until the mixture resembles coarse crumbs to maximize flakiness.
- Be mindful of not overworking the dough when adding ice water; this keeps the crust tender and light.
- When mixing your apple filling, allow it to sit for 20 minutes to draw out the juices, which helps develop flavor and consistency.
- Always bake your pie on a lower rack to ensure the bottom crust cooks evenly and consider using a pie shield if the edges brown too quickly.
Flaky Apple Pie Recipe FAQs
How do I choose the best apples for the filling?
Absolutely! For the perfect balance in your Flaky Apple Pie, I recommend using a mix of Granny Smith and Honeycrisp apples. Granny Smith adds a nice tartness, while Honeycrisp brings sweetness and juiciness. Look for apples that are firm, with no bruises or dark spots. A good rule of thumb is to pick ones that feel heavy for their size!
How should I store my Flaky Apple Pie?
You can store your Flaky Apple Pie at room temperature for up to 2 days if you cover it loosely with foil or wax paper to maintain the texture of the crust. For extended freshness, refrigerate it for up to 5 days, well-covered with plastic wrap or in an airtight container.
Can I freeze my Flaky Apple Pie, and how?
Yes, you can freeze your Flaky Apple Pie! Wrap it tightly in plastic wrap followed by aluminum foil to prevent freezer burn. It can last up to 3 months in the freezer. When you’re ready to enjoy it, bake from frozen at 400°F (200°C), adding an extra 10-15 minutes to the baking time. The aroma will fill your kitchen, and it’ll taste just as delightful as fresh!
What if the crust is too crumbly?
Very! If your crust is crumbling too much, it may be due to not enough moisture. Gradually add more ice water, one tablespoon at a time, until the dough just holds together without becoming wet. Remember, the key to a flaky crust is to avoid overworking the dough!
Is this Flaky Apple Pie safe for kids/pets?
While this Flaky Apple Pie is generally safe for most, be cautious with ingredients like sugar and spices in moderate amounts for pets. Always ensure that no chocolate or toxic ingredients (like nutmeg in large amounts) are present, as these can be harmful to dogs and other pets. For kids, this pie is a great treat, but serving smaller slices is always a good idea!
How can I avoid a soggy bottom crust?
Absolutely! To prevent a soggy bottom crust in your Flaky Apple Pie, consider pre-baking (or “blind baking”) the crust for about 10 minutes before adding the filling. You can also sprinkle a bit of flour or cornstarch on the crust before filling it, which helps absorb excess moisture from the apples while baking. Additionally, baking directly on the lower rack of the oven ensures optimal crispiness!
Flaky Apple Pie
Ingredients
Equipment
Method
- In a large bowl, combine flour and salt. Cut in the cold butter until the mixture resembles coarse crumbs. Gradually add ice water until the dough forms. Divide the dough and chill for at least 1 hour.
- Toss the sliced apples with lemon juice, both sugars, flour, cinnamon, nutmeg, and a pinch of salt. Let the mixture sit for 20 minutes to develop those delicious flavors.
- Roll out one chilled dough disc into a 12-inch circle. Carefully fit it into a 9-inch pie dish. Roll the second disc to create your top crust or a lovely lattice.
- Fill the pie shell with the apple mixture, and dot the top with butter for extra richness. Cover with the top crust, crimp the edges, and cut vents or weave a lattice for that classic touch.
- Brush the top with the beaten egg and milk mixture for a gorgeous golden finish. If you like, sprinkle coarse sugar over the top for added sweetness and crunch.
- Bake at 400°F (200°C) for 20 minutes, then reduce the temperature to 375°F (190°C) and bake for another 35–40 minutes, until the crust is golden brown and the filling is bubbling with joy.
- Let the pie cool on a wire rack for at least 2 hours before slicing to help the filling set.